Table of Contents
- Preface
- 1. Tutorial Overview
- 2. Defining Search Requirements
- 3. Website Search Application Design
- 4. Choosing Hardware and Installing SIETS
- 5. Adding SIETS Storage
- 6. Adding and Indexing data
- 7. Developing Search Form
- 8. Adding Features
Preface
This preface is an introduction to the SIETS Tutorial: Website Search. It defines the audience, and lists typographic conventions and abbreviations used throughout the guide.
This tutorial is compliant with the SIETS server version 3.2 or higher and the SIETS Enterprise Manager version 1.0.
This section contains the following topics:
Audience
This tutorial is intended for corporate website designers, project managers, or other interested parties that want to quickly learn how to integrate SIETS search in a corporate website.
Typographic Conventions
The following styles and conventions are used in this guide:
|
Convention |
Description |
|---|---|
|
|
Represents command, function, file and directory names, system messages, and command-line commands. |
|
Hyperlink |
Represents a hyperlink. Clicking on this field takes you to the identified place. |
|
Source code |
Represents code. |
Abbreviations
The following abbreviations are used in this guide.
|
Abbreviation |
Description |
|---|---|
|
XML |
Extensible markup language. |
|
XSLT |
XML stylesheet transformation. |
|
HTTP |
Hypertext transport protocol. |
1. Tutorial Overview
This tutorial is designed to familiarize a new user with all necessary steps to be performed to incorporate the SIETS search functionality in an existing website. It is based on imaginary but realistic present situation and goals.
For more information on present situation and goals, see Defining Search Requirements.
This tutorial is not designed to document all SIETS features and functionality.
This section contains the following topics:
1.1. About SIETS
SIETS is a system for information storage and retrieval. The SIETS system consists of the SIETS server and application programming interface (API) for building information storage and retrieval applications.
The SIETS server is an operational unit that performs information storing and retrieval tasks by executing a predefined set of commands.
SIETS API is used for building applications that are specific and customized according to your company needs.
1.2. Tutorial Objectives
By the end of this tutorial, you will be able to:
-
Choose hardware for the SIETS system according to the size and number of records.
-
Install SIETS.
-
Add and configure the SIETS storage.
-
Add data of your website to the SIETS storage.
-
Develop and include a SIETS search form into your website.
1.3. Required Reading
The following documentation supports the tutorial activities:
|
Title |
Description |
|---|---|
|
SIETS Installation Guide |
Describes how to install SIETS. |
1.4. Suggested Reading
The following SIETS documentation is available:
|
Title |
Description |
|---|---|
|
SIETS Administration and Configuration Guide |
Describes the SIETS administration and configuration concepts and contains step-by-step instructions. |
|
SIETS Developer’s Guide |
Describes SIETS from an application developer’s perspective and provides reference material for building customized applications based on SIETS. |
2. Defining Search Requirements
This section describes present situation, defines goals to be achieved, and presents major actions that must be performed to achieve the defined goals.
2.1. Present Situation
There is a corporate website that has no search functionality, or it is of a quite poor quality and needs a lot of effort to keep it updated.
2.2. Goals
The following goals are set:
-
To add search functionality to corporate website to enable clients and employees find any document on the corporative website matching given keywords.
-
To reduce effort for keeping the search functionality updated.
-
To introduce as few changes to existing infrastructure as possible.
2.3. Actions
There are the following major actions to be performed to achieve the goals set in the previous section:
-
Install the SIETS server.
-
Gather and index data from the corporate website.
-
Add search functionality to the website.
3. Website Search Application Design
The following diagram describes how the SIETS server, a corporate website and website users are related.
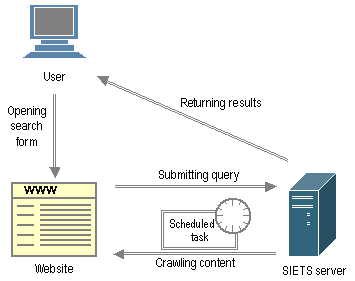
Figure 1: Understanding website search application design
The tasks presented in Figure 1 are explained in the following table:
|
Task name |
Description |
|---|---|
|
Opening search form |
A user accesses the website, opens the search form, and enters search query. |
|
Submitting query |
The website submits the entered search query to the SIETS server. |
|
Returning results |
The SIETS server processes the search query and returns search results to the user. Search results are formatted using XSLT. |
|
Crawling content with a scheduled task |
The SIETS server crawls content of the website on scheduled task basis. |
4. Choosing Hardware and Installing SIETS
This section describes how to choose hardware on which the SIETS system is to be run and how to install SIETS from the SIETS setup that is downloadable from the www.siets.net website and installs the SIETS server and SIETS Enterprise Manager.
In this tutorial, the SIETS server and SIETS Enterprise Manager will be installed on the same computer.
For information on SIETS installation overview, see the SIETS Installation Guide, Installation Overview.
4.1. Choosing Hardware
It is recommended to install SIETS server on a separate computer. However, if the size of dataset to be indexed with SIETS is small, the SIETS server can be run together with other applications like web server or database server on the same computer.
The recommended hardware configurations depending on the approximate number of documents are the following:
|
Number of documents |
Total size of documents |
Hardware parameters |
||
|---|---|---|---|---|
|
CPU |
RAM |
Disks |
||
|
20 000 |
100 MB |
any |
512 MB |
any |
|
500 000 |
1 GB |
P4 |
1 GB |
any |
|
3 000 000 |
10 GB |
dual Xeon |
4 GB |
SCSI RAID |
|
> 5 000 000 |
> 30 GB |
The SIETS cluster solution should be considered. Consult SIETS support. |
||
Note: The parameters provided in the previous table are only for recommendation purposes.
Note: SIETS cluster solutions can be used also for smaller numbers of documents than listed in the previous table. It will provide higher performance on low-cost hardware and provide redundancy or allow handling larger search volumes, > 600 requests per minute.
4.2. Installing SIETS
To install SIETS, there is prerequisite software that needs to be installed before it.
Installing the SIETS server and SIETS Enterprise Manager is the same whether installing SIETS for goals set in this tutorial or for any other scope. Installation is designed as a wizard and the steps are intuitive, also each step is already described in the SIETS Installation Guide. Therefore, this section shortly describes each installation part and gives reference to the SIETS Installation Guide.
4.2.1. Installing Linux
Currently the SIETS server is available only on Linux operating system.
Prior of installing the SIETS server, Linux must be installed.
As you might know Linux comes with various distributions. SIETS currently has been tested on RedHat, SuSE, Slackware, Mandrake and Debian. However, there should be no problems running SIETS on other distributions.
If you are new to Linux, you can download the ISO image of the SIETS server that is bundled with RedHat Linux 9 from the www.siets.net website. The image installs both: the operating system and SIETS server. The installation from the image is user-friendly, and you will be asked for as little questions as configuring your network parameters.
4.2.2. Installing Web-server
Before installing the SIETS server and SIETS Enterprise Manager, check that web server is installed. A web server is required by SIETS server and SIETS Enterprise Manager to function properly. We recommend using Apache web server, because the SIETS installation detects Apache web-server and integrates within it automatically avoiding additional configuration overhead.
Usually a web server is installed together with an operating system.
Check the
httpsd package during Linux installation.
4.2.3. Installing SIETS
You can download the latest SIETS installation version form www.siets.net website. The installation is a shell script that is run from the console. It is interactive and will ask all necessary questions.
After installing SIETS, the web-server must be restarted to apply necessary user rights that are configured by the SIETS installation. To communicate with the SIETS server through UNIX domain sockets those are located in the SIETS storage directory, the user account, which is used to run the web-server, must have an access to the SIETS storage directory.
For detailed information on the installation steps, see the SIETS Installation Guide.
5. Adding SIETS Storage
This section describes how to add a new SIETS storage using SIETS Enterprise Manager. You will learn how to add data to the SIETS storage in the next section.
SIETS storage is a data collection for storing SIETS documents in a format that ensures a search is performed very fast.
SIETS Enterprise Manager is an administrative tool, which allows administering and configuring all SIETS system parameters and options.
For more information on SIETS storages and SIETS Enterprise Manager, see the SIETS Administrator’s Guide, Introduction.
5.1. Prerequisites
To complete steps in this section, the SIETS server must be installed.
5.2. Objectives
In this section you will learn how to add a new SIETS storage and configure it for website data.
5.3. Tutorial Steps
Perform the following steps:
-
Open the Internet browser.
-
In the Address field, enter the following
-
In the welcome window, click the link.
-
In the User name field, enter ‘guest’.
-
In the Password field, enter ‘guest’.’
-
Select Login.
-
Select SIETS Storages.
-
Select Add Storage.
-
To add storage to the SIETS server that has been automatically detected by SIETS Enterprise Manager, select Add to New Storage next to the SIETS server IP address.
-
In the Storage name field, enter the SIETS storage name, in this case, website.
-
In the Template drop-down list box, select Default.
-
To start the SIETS storage automatically at every boot, select the Start storage at boot check box.
-
In the Storage description field, enter SIETS storage description of the storage for your own convenience.
-
To finish adding the SIETS storage, click Create.
-
To start the SIETS storage, next to the newly created SIETS storage, select Start.
http://<server address>/siets/
where the <server address> is hardware server address on which the SIETS server and SIETS Enterprise Manager is installed.
The SIETS welcome window appears.

Figure 2: The SIETS welcome window
The SIETS Enterprise Manager authorization window appears.
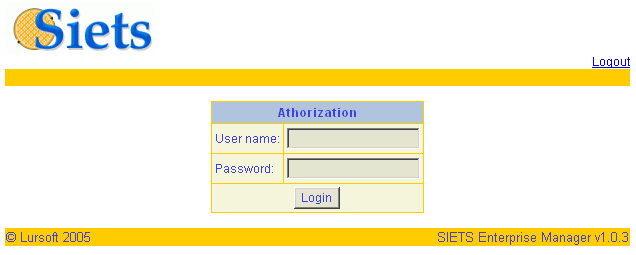
Figure 3: Logging in
For information on administering user accounts, see the SIETS Administrator’s Guide, Administering SIETS Enterprise Manager User Accounts.
The Main Menu window appears.
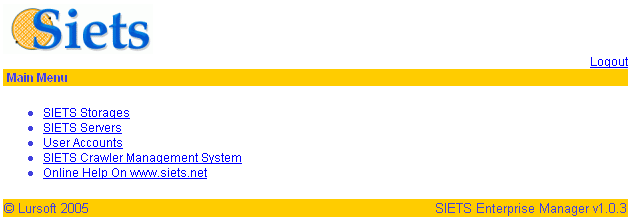
Figure 4: The Main Menu window
An empty storage list appears.

Figure 5: The SIETS storage list window
The Add New Storage window appears.
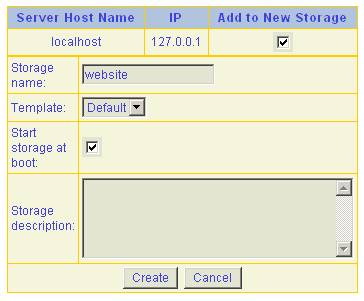
Figure 6: Adding SIETS storage
The SIETS Storage window appears with the newly added storage in the SIETS storage list with inactive status.

Figure 7: Viewing newly created SIETS storages list
The status of the SIETS storage changes to Active and the available action changes to Stop.

Figure 8: Starting the SIETS storage
The SIETS storage is up-and-running. No further configuration changes are necessary for website indexing.
6. Adding and Indexing data
This section describes adding data from the website to the SIETS storage added in the previous section. For this purpose a crawler that is integrated in SIETS Enterprise Manager is used.
No actual software development is required in this section.
The www.siets.net website is used as a sample website in this section. You can choose this or your own corporate website to complete tutorial steps of this section.
6.1. Prerequisites
To complete steps in this section, the SIETS storage must be running.
6.2. Objectives
In this section you will learn how to set up a crawler task and how to crawl and index data form the website.
6.3. Tutorial Steps
Perform the following steps:
-
After you have logged in SIETS Enterprise Manager, in Main Menu, select SIETS Crawler Management System.
-
To add a new task, select Add New Task.
-
In the Task name field, enter the crawler task name, in this case, website-indexing.
-
In the Type section, choose Regular, which implies that the crawling and indexing will be performed every day at 02:15 AM when traffic to site is less.
-
To crawl the website more or less often, change the minute, hour, day, and month as necessary. For example, to crawl the website 4 times a day, in the Hour field, enter 0, 6, 12, 18.
-
In the SIETS storage drop-down list box, select the SIETS storage name that has been added in the previous section, in this case, website.
-
Select Save.
-
To add the website address to the crawler task, in the Task name column, select the newly added task, in this case, website-indexing.
-
Select Add New Domain.
-
In the URL field, enter the URL of the website that you want to crawl. As mentioned earlier, in this tutorial the www.siets.net website is used as a sample, but you can enter address of your corporate website.
-
To minimize the crawling time, in the Speed field, enter the maximum number of request per second your website can handle.
-
If you want to crawl and index password protected intranet sites of your website, in the User name and User password fields enter the user name and password.
-
In the File Extensions section, select data types you want to index.
-
Select OK.
-
To save the changes made, select Save.
-
To run the crawler task immediately, in the Action column, select Run Now.
-
Wait until the crawler task status changes back to idle.
-
In the Main Menu window, select SIETS Storages.
-
In the SIETS storages list, select the storage name, in this case, website.
-
In the Number of Documents column, observe that 61 documents have been added to the SIETS storage.
-
Select Siets Command.
-
To perform the search command, in the SIETS Command field, select search.
-
In the Search query field, enter a word contained in the website that has been indexed.
-
Select Run.
The SIETS Crawler Tasks window appears.

Figure 9: Viewing SIETS crawler tasks
The Add New Task window appears.
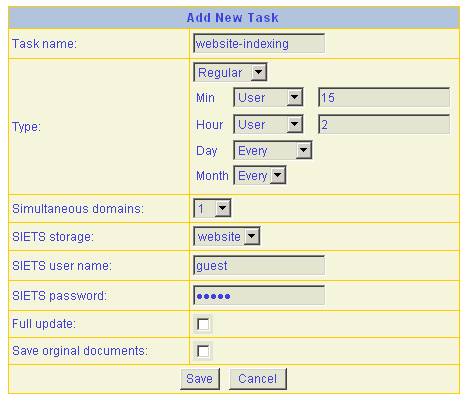
Figure 10: Adding a new SIETS crawler task
The newly added SIETS crawler task appears in the crawlers list.

Figure 11: Viewing newly added SIETS crawler task
The Task Details window appears.

Figure 12: Editing the task details
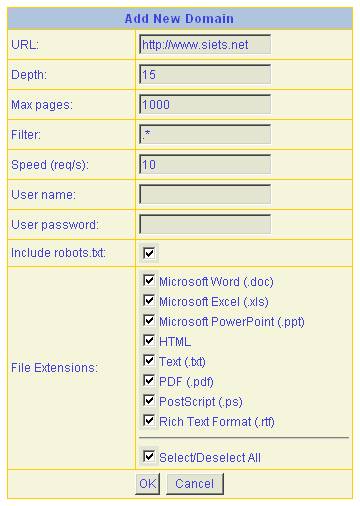
Figure 13: Adding domain to crawler task
Note: The number of requests per second can be also a decimal number, for example, 0.5 means that in 2 seconds one request is performed.
Note: HTML here is content type of the resource determined by the Content-type HTTP header rather than a file extension in URL. If selected, the crawler
will index PHP and other dynamic pages that generate HTML output as
well.
The Task Details window appears with the added website listed.
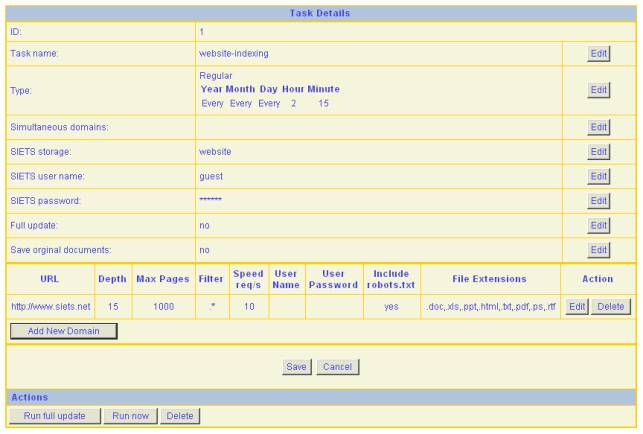
Figure 14: Viewing task details
The crawler list appears.

Figure 15: Viewing task details
Note: If you do not run the crawler task manually, it will be run according to the schedule set in steps 4 and 5.
The crawler task status changes to crawling and later to indexing.
The further steps in this section imply checking the indexed data.
The SIETS storage instance window appears.

Figure 16: Viewing SIETS storage instance
The SIETS command window appears.
The search result is displayed on the right side of the SIETS command window in XML format. The next section describes how to display the search results in a human readable format in an HTML form.
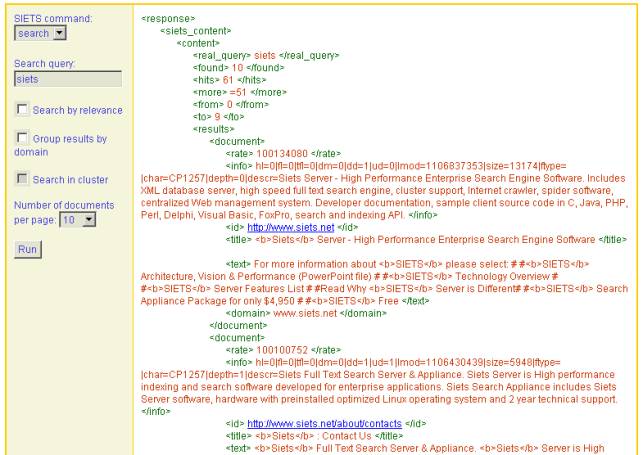
Figure 17: Viewing result of the search command
7. Developing Search Form
This section describes developing a search form for the SIETS storage and deploying it in the corporate website.
7.1. Prerequisites
To complete steps in this section, data must be crawled and indexed into the website storage.
7.2. Objectives
In this section you will learn how to set up a crawler task and how to crawl and index data form the website.
7.3. Tutorial Steps
This section contains the following topics:
7.3.1. Developing Search Form
To develop a search form, proceed as follows:
-
Log into the server where the SIETS server is installed through telnet or ssh, or directly form the console.
-
Find the web root of your web server.
-
Change the current directory to the web root.
-
Change the current directory to the
sietsdirectory. -
Search for the form template file
search.html. -
View the file content. You can use the
catcommand, for example. -
Copy the search form template file
search.htmltosearch-website.html. -
Open the
search-website.htmlfile for editing and to change input field’s with the namestoragevalue fromtesttowebsite: -
In the sample SIETS search form, enter one or more keywords that are found in the website, for example, php sample, and select Search.
-
You can integrate this search form within you existing website by linking to this form and customizing its HTML code to fit the website design.
-
Also you can embed search form anywhere in your existing website by including the search form’s HTML code:
By default, on most distributions, the apache’s web root is /var/www/html.
cd /var/www/html
There is the siets directory in the web root.
cd siets
<html>
<head>
<title>Page title</title>
</head>
<body style="text-align: center">
<h4>Sample SIETS Search Form</h4>
<form action="/cgi-bin/siets/api.cgi" method="get">
<input type="hidden" name="storage" value="test" />
<input type="hidden" name="command" value="search" />
<input type="hidden" name="xslt" value="default_web_results.xsl" />
<input type="text" name="query" value="Enter search query" />
<input type="submit" value="Search" />
</form>
</body>
</html>
cp search.html search-website.html
<input type="hidden" name="storage" value="website" />
The search form is available through the Internet browser, URL http://<server address>/siets/search-website.html.
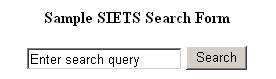
Figure 18: Sample SIETS search form
Search results are displayed in the page.
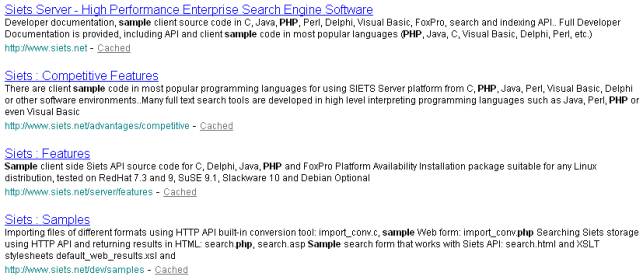
Figure 19: Viewing search results
<form action="http://<siets server address>/cgi-bin/siets/api.cgi" method="get">
<input type="hidden" name="storage" value="website" />
<input type="hidden" name="command" value="search" />
<input type="hidden" name="xslt" value="default_web_results.xsl" />
<input type="text" name="query" value="Enter search query" />
<input type="submit" value="Search" />
</form>
Note: In this case the absolute URL to the SIETS server should be provided in the action attribute of the form element.
7.3.2. Customizing Results
Search results can be customized by editing XSLT stylesheet.
To customize search results, proceed as follows:
-
Go to the
sietssubdirectory of the web root, like in previous section: -
Go to the
templates/stylesubdirectory. -
Perform the following customization:
-
Change font sizes, colors, font faces, and background as necessary.
-
Remove document URL and link to the cached document.
-
Order results by relevance. Default ordering is the order in which documents are crawled form the website.
-
Add drop-down to select number of documents in a result set.
-
To add the parameters, add the
relevancehidden input field and thedocsmenu to the form element in thesearch-website.htmlfile:
cd /var/www/html/siets
XSLT stylesheets are located in the templates/style subdirectory.
cd templates/style
The default stylesheet (see Figure 18) for result formatting in HTML is supplied in the defalt_web_results.xsl file:
<?xml version="1.0" encoding="utf-8"?>
<xsl:stylesheet version="1.0"
xmlns:xsl="http://www.w3.org/1999/XSL/Transform"
xmlns:siets="www.siets.net"
exclude-result-prefixes="siets">
<xsl:import href="url_encode.xsl" />
<xsl:output method="xml" encoding="utf-8" indent="yes"
doctype-system="http://www.w3.org/TR/xhtml1/DTD/xhtml1-transitional.dtd"
doctype-public="-//W3C//DTD XHTML 1.0 Transitional//EN" />
<xsl:template match="/">
<html>
<head>
<meta http-equiv="content-type" content="text/xhtml; charset=utf-8" />
<style>
p, a, span { font-family: Arial, Helvetica, Sans-serif; font-size: 16px; }
a { text-decoration: underline; color: #0000FF; }
span.bot { font-size: 12px; }
p.err { color: red; font-weight: bold; }
a.grey, span.grey { color: #6f6f6f; font-size: 12px; }
a.teal, span.teal { color: teal; font-size: 12px; }
</style>
</head>
<body>
<xsl:for-each select="siets:reply/siets:content/results/document">
<xsl:call-template name="result" />
</xsl:for-each>
<xsl:for-each select="siets:reply/siets:error">
<xsl:call-template name="error" />
</xsl:for-each>
</body>
</html>
</xsl:template>
<xsl:template name="result">
<p>
<a>
<xsl:attribute name="href"><xsl:value-of select="id" /></xsl:attribute>
<xsl:value-of select="title"/>
</a>
<br />
<span class="bot">
<xsl:value-of select="text" disable-output-escaping="yes" />
</span>
<br />
<span class="teal">
<xsl:value-of select="id" />
</span>
<xsl:text> - </xsl:text>
<a class="grey">
<xsl:attribute name="href">api.cgi?storage=<xsl:call-template name="url-encode"><xsl:with-param name="str"
select="/siets:reply/siets:storage" /></xsl:call-template>&command=retrieve&id=<xsl:call-template name="url-e
ncode"><xsl:with-param name="str" select="id" /></xsl:call-template></xsl:attribute>
<xsl:text>Cached</xsl:text>
</a>
</p>
</xsl:template>
<xsl:template name="error">
<p class="err">
<xsl:text>Error </xsl:text>
<xsl:value-of select="code" />
<xsl:text>: </xsl:text>
<xsl:value-of select="text" />
</p>
</xsl:template>
</xsl:stylesheet>
The following is a sample customization to the stylesheet:
<style>
body { background: #DDBB88; }
p, a, span { font-family: Verdana, Arial, Sans-serif; font-size: 12px; }
a { text-decoration: underline; color: #000033; }
span.bot { font-size: 10px; color: #666655; }
p.err { color: red; font-weight: bold; }
a.grey, span.grey { color: #6f6f6f; font-size: 10px; }
a.teal, span.teal { color: teal; font-size: 10px; }
</style>
The following block has been removed:
<br />
<span class="teal">
<xsl:value-of select="id" />
</span>
<xsl:text> - </xsl:text>
<a class="grey">
<xsl:attribute name="href">api.cgi?storage=<xsl:call-template name="url-encode"><xsl:with-param name="str"
select="/siets:reply/siets:storage" /></xsl:call-template>&command=retrieve&id=<xsl:call-template name="url-e
ncode"><xsl:with-param name="str" select="id" /></xsl:call-template></xsl:attribute>
<xsl:text>Cached</xsl:text>
</a>
The result of the customization looks as follows:
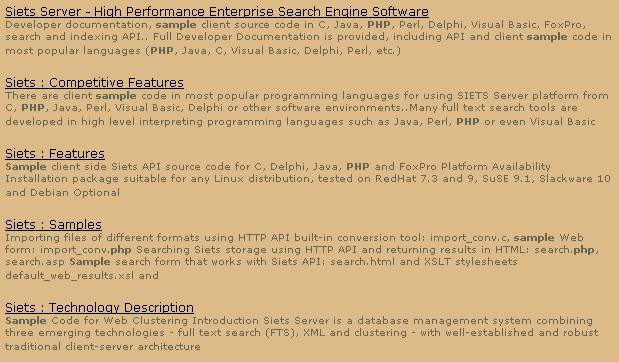
Figure 20: Viewing search results
Further search result customization involves adding additional parameters to the search form.
The following parameters can be added:
<input type="hidden" name="relevance" value="yes" />
<br/>Results on page:
<select name="docs">
<option>5</option>
<option selected>10</option>
<option>20</option>
<option>50</option>
<option>100</option>
<option>1000</option>
</select>
8. Adding Features
Using the XSLT stylesheet has limited possibilities of adding advanced features of the SIETS server to a search form.
To use features like page listing, similar document search, spelling corrections, or other, consider using script language like PHP, ASP, Perl, or other for result set formatting.
For tutorial instruction on these other features, see the SIETS Tutorial: News DB Search.
See the samples for PHP and ASP provided for download at www.siets.net website: